No time to read now? How about listening to the article? Try it out in the player below!
As we know, Microsoft Power Automate is a powerful tool to automate processes across many platforms. There is a huge quantity of connectors that you can check out here. You can automate processes, send automatic reminders and tasks, move data between platforms, and so on.
I’ve decided to write this article to show you some limits and best practices that I’ve found out during all the time that I’ve worked with Power Automate. It aims to help you:
- Planning your flow
- Identify whether Power Automate is the best tool for you need
- Some cautions that you need to have
- Improve performance
Let’s get started!
Planning the Project
When we get a task to be automatized, we already want to open the Power Automate and create our flows, connect with connectors, variables, conditions, actions, etc. I know what it’s like, I also liked to do that.
if you just have one flow to be done, that’s ok, probably will work fine, but if you have a big project where that quantity of flows can grow, you can start to face many problems related to platform limits, maintainability, and performance.
Before starting, we need to plan your automation business process, it collects all the information needed like:
- License type: you need to understand what license type you have. Each license type has different limits.
- Volumetry of execution: identify how many flow instances you may running simultaneously.
- Try to understand the complexity that business flow may have.
Also, Microsoft provides us many contents about the planning, implementation, and test of the process:
- Planning: Identify the who, what, when, and why.
- Design: Design your new automated process “on paper,” and consider various methods of automation.
- Make: Create the Power Automate flows.
- Test: Try out the automation you created.
- Deploy and refine: Start using the automation in production, identify processes that can be refined, and decide what to change or add.
You can check it out here to get more details about these steps
Volumetry
The volumetry of the Power Automate flows is based on the quantity of the execution that the flow may have. It’s very important you understand it. How many executions by minute, hour, day, and you need to find out whether there will be many flows instances running during the day at the same time.
In my opinion, is one of the main points for us to have success in our implementations. We need to make sure our solution may be scalable, so we can’t have trouble when the customer operation grows their business, or the project success may be committed.
When your Power Automate process reaches its limit, we may have issues like:
- Execution timeout
- Flow instances canceled by platform
- Failed to start new flow instances
- Flow instance throttling, taking more time to execute new flow instances
And besides these above items, you may need to ask the customer to change the Power automate license or to buy an execution package add-on. In the worst case, you’ll need to re-create the flow using another approach. None of them is well news to give to your customer, isn’t it?
You may avoid it with some questions before start design the flow:
- How many concurrences flow instances may I have during the day?
- For instance, if you flow starting when a task is created, you need to find out how many tasks may be created per day.
- How many actions I may create inside of flow? Remember that actions have limits. Check out here
- What license type does the customer have? Each one has some limits
- What Power Automate connectors I will need? Connectors also have additional limits.
- For instance, the Mail connector has a limit of 5 emails per 5 minutes in addition to the 100 mails per 24 hours, so if you need more than it, this connector can’t be considered
All the connectors reference you can check out here
- Does the business process need the high performance? If yes, maybe Power Automate can’t be the better choice
Also, you can check out Limits for automated, scheduled, and instant flows to understand all the Power Automate limits. Once you can collect all this information and reply to the questions, you will be base to design great business automation for your project, and you won’t have further problems regarding performance, support, and connectors throttling.
Tips and tricks
During the projects with Power Automate, I faced some points that I needed to redesign or change the business logic to make sure that the flow will work fine. I would like to share with you some tips that I’m using to create flows:
#1 reduce the flow size
Avoid creating big flows, this can make it difficult whether you need to do some change or add new logic, instead, create a sub-flow with small logic parts, besides you keep the main flow small, this sub-flow can be reusable. Also, a big flow may freeze the browser.
#2 Create standards
- Create flow’s name standards (titles)
- Create action’s names standards and add comments when makes sense.
- Share the flow with other users, so if the user was disabled, you won’t have problems
#3 Depth levels and Request limits
- Avoid the use of conditional action (ifs) inside of other conditional actions. There is a limit of 8 depth levels. You can create a sub-flow as an option.
- Keep in your mind that ForEach action executes all the nested actions for each item of the list, so you need to take care with the action’s execution limit. Check out here
- When you’re using Dataverse connector:
- To make queries, make sure you’re retrieving only needed columns to improve performance
- Always as possible, set up the connection to use the application user. This user gives you a higher limit of executions on the platform. See Request limits allocations on non-licensed user
#4 Exception handling & Retries
As we know exceptions will happen, right? So, we need to be prepared to catch up on those failures and compensate for them. To handle with exceptions, you can use scopes to logically group actions that must succeed together.
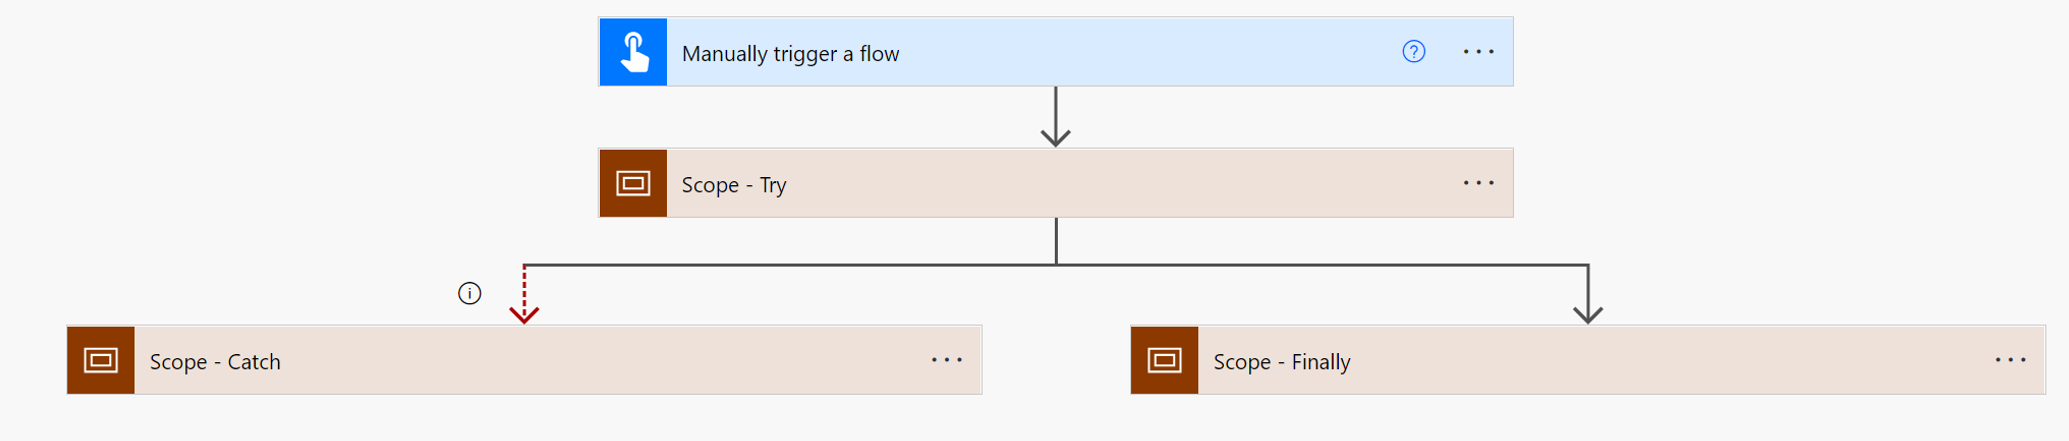
Where:
- Scope – Try: all the business logic flow
- Scope – Catch: the flow will go through this scope always that “Scope – Try” throw exceptions
- Scope – Finally: the flow will go through this scope since “Scope – Try” haven’t thrown exceptions
In this way, the flow will be prepared to handle with exceptions. You’ll add some actions inside of “Scope – Catch” like saving logs at Azure Application insights, notifying users by SMS, emails, Teams, so the users will be immediately notified, and they may fix the issue as soon as possible.
Let’s talk about the retries, avoid the use of default retry settings from actions. You can change the policy to align with settings that best reflect our business requirements. Hereby is a sample:
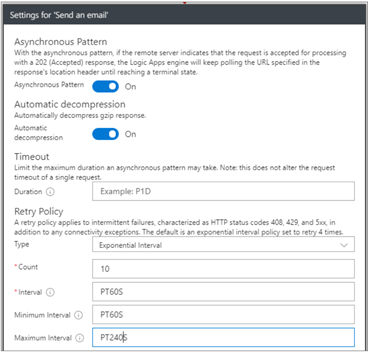
By using these settings, we will retry 10 times and set our default interval to be 60 seconds. We will then provide additional optional parameters which will dictate a random interval retry value that is between 60 seconds and 240 seconds.
#5 Power Automate + Custom Process Action
If you think some piece of flow may be complex, you may transform it into a Custom Process Action, so you may write your logic using C# and register on Custom Process Action through plugin registration. Once done, it will be available to use on flow through bound or unbound action. You check out A Pro Code Escape in Power Automate for a good understanding of how it works.
#6 Test and test again
After all these steps, always make tests on your flow, don’t forget to check the performance, make improvements whether need. It’s crucial to you have a healthy environment and your flows running faster ever.
In addition, I would like to share this great video where you can learn about best practices
Conclusion
The Power Automate is a powerful low code platform to create rich business processes automation with a huge quantity of connectors. Even with this power, we need to pay attention to some aspects regarding the performance, limits, and complexity or we may start to get issues and don’t enjoy all the benefits the platform gives us. Planning and implementing best practices is essential for the project’s success.
I hope this content can help you to create great flows in your projects.
